The launch date for Alaska is closing in, and you may notice that Serenity looks a bit different for this leg of her journey. Click on for a rundown of work done!
Complete list of work done on Serenity in SF:
- Replaced clutch assembly (12.18.16)
- New drive belt (12.18.16)
- Replaced front and rear suspension (12.19.16)
- New rear tire, back to City Grips (2.9.17)
- Replaced upper and lower steering bearings and races (2.19.17)
- Flushed and bled both brakes (2.19.17)
- Replaced left brake lever (secondhand freebie, less bent than mine) (2.19.17)
- Replaced center stand (secondhand freebie, same story as above) (2.19.17)
- New air filter (3.19.17)
- New spark plug (3.19.17)
- New gas can arrangement (3.20.17)
- New crash bars (3.22.17)
- New front tire, back to City Grips and with Ride-On applied (3.30.17)
- New hard luggage, repurposing tall 50 cal ammo cans (4.4.17)
Work on hold for Seattle:
- Oil change (actually this should probably happen before Seattle)
- New drive belt (carry old as spare)
- New rear tire (carry old as spare)
- Replacement variator (noticed wear on splines at last belt change)
- Valve lash adjustment (the only job I'll be outsourcing, if I can help it)
I'm extremely lucky to have found work at Scuderia while I was in SF. Not only was it a fun place to find employment, I learned a lot, and even got to test ride some bikes. On slow days or after hours I could borrow tools, throw my bike on the lift, and work on it myself.
This was especially handy for jobs like replacing my fork bearings, which I was dreading; mine were so damaged they creaked audibly in a left hand turn. While I was in there, hammering out the races and replacing them would go
much more smoothly with the right tools. Thank you, Matt, for the loaners!
 |
| Nice, a tool for setting races. This one is the shop's. |
 |
| This fell out of my bike. Oof, it was overdue. |
 |
| All done, not too bad. Between this and the new suspension, my bike handles like new! |
Next up: I needed to increase my capacity for spare fuel. I wanted something unobtrusive and not too bulky – I'd rather disperse the weight of spare fuel because there is
no good place on the bike for one giant, heavy, awkward 2 gal jerry can. After some research, I splurged on two 1.5L Fuel Friend cans on ebay (~$30 USD each). The strap channels were a bonus over the 2L size, and a compromise because I intended to mount them underneath my Pelican case. A bracket would be required but it wouldn't need to support much weight, just guide straps into the correct position to hang off my existing rear rack.
 |
| Thanks, Europe, I'll take two. |
 |
| After some measuring and designing, I raided Scuderia's cardboard dump to make a mock up. |
 |
| With a couple holes, it will sit like this. |
 |
Time to hit the aluminum shears, hammer, and drill.
Thank you, Haley, for saving scrap aluminum sheeting for me, and lending me tools! |
 |
Straps will go over the bars, but under the plate for the Pelican (there's about 2mm clearance).
Fingers crossed it will hold up. |
 |
| Initial fitting is OK. |
 |
| Final adjustments, and then sanding. |
 |
| Ready for weighted test. |
Between all my various fuel bottles, my total spare fuel capacity is:
2x (887ml MSR bottles) + 1500ml Gasolina can + 2x (1500ml Fuel Friends) = 6274 ml = 1.65 gallons
This is more spare fuel than I've ever carried before, but even with all these bottle full I wouldn't confidently make it to Deadhorse (if I decide to go). At 65mpg (a conservative estimate) my 2 gal tank would go 130 miles, and my additional fuel would go another 107 miles – not quite enough to cover the 240 mile stretch between services. If I decided I wanted to go (I haven't), I would need to empty a 2L soda bottle and fill it with gas to bring my total spare fuel up to 2.18 gallons (~270 mile range). Seriously though, if it looks like rain I'm just proceeding directly to the Kenai peninsula.
 |
| Crooked butt. |
Last big change: my crash bars were never quite right again after being rear-ended in Atlanta, and taking them off to work on the bike was a pain. I found new crash bars from a German company called
Fehling, which would be
comparable in price (~$200 USD) to the
crash bars I had before. It's quite a chunk of change for something I wasn't sure I'd like, but I figured there's only one way to find out if I liked it!
Installation commenced on a particularly slow day at Scuderia.
 |
| My present from the Deutschland (via Austria) has arrived! |
 |
| Instructions in German. Go figure. |
 |
| I feel like I'm assembling IKEA furniture. |
 |
| 4 hours and a lot of cursing later. FWIW Pete ordered a set as well, and I finished his installation in an hour. |
 |
| Minor detail: the way the brackets stack with the grab rail pushes the bucket too high to engage the seat latch. |
 |
| I wanted a locking seat, so removed these to help it sit lower... |
 |
| ...And then just decided to toss this piece. Problem solved, it's dead weight anyway! |
If you decide to install these bars and want to keep your existing grab rail, another option is to simply grind off the corners of that plastic dust guard (Pete's choice).
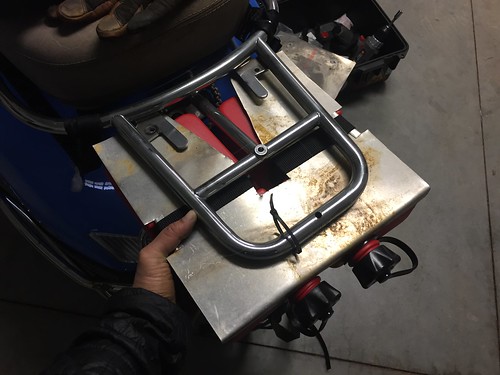
Now, it's time to try these sweet tall 50 cal ammo cans for luggage!
 |
| That needs to go on that. |
After some research, it looked like 50 cal ammo boxes would be the lightest, most affordable, and most available option. Standard boxes were too short though, and the 'fat' 50 was too wide. That's when I stumbled upon the tall 50 cal, which are available used on ebay for about $50-60/pair.
Going to hard luggage was a tough choice for me. I've been a fan of my soft luggage. It's lightweight. It's soft, if my bike falls on me. It's easy to remove and take indoors, and then I have a sleek narrow bike again.
The drawbacks: my well-traveled soft bags are beginning to fail at the same spot (I suspect it's not designed to wrap around the curved grab rail of a Vespa), which is why I hold them both on with Rok straps now. A couple more falls have taken their toll. They have rain covers, but the bags themselves are not waterproof and I have to remember to put the covers on... I had a mold problem in one bag already, which means all contents are mandatory double ziplock bagged. Also, I don't put anything I couldn't live without in my side bags, in case it gets rained on, stolen, or otherwise damaged in a fall. I looked at waterproof options, but they were all so pricey and designed for motorcycles.
Switching to hard luggage means I could have waterproof, lockable storage, but sacrifice weight and convenience of removal – they would be 'permanently' bolted on. Would I like it? Let's find out.
 |
Placement tests. I needed the box back far enough to access the center stand.
Also, I needed to know if it was tall enough to not require another bracket. |
 |
| Stubby red pencil traces some shapes. |
 |
| There's just enough room to bolt directly without blocking the lid! Yay! |
 |
| Drill this hole. It matches up to one of the black brackets included in the Fehling kit. |
 |
| Bzzt. |
 |
| Now to make it match. |
 |
Wide load! Sorry, I forgot to take photos of the hardware.
I used six 10mm bolts with lock nuts, with washer and rubber washer spacers. |
 |
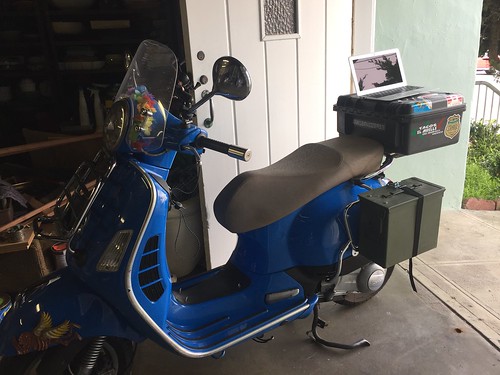
| Test ride! |
 |
| The award for most ridiculous bike in Trader Joe's parking lot goes to... Oh, it's its own reward. |
The entire arrangements is probably 10-15lbs heavier than running my soft luggage, but feels sturdy, and amazingly it isn't any wider than my old luggage (happy surprise). Once the
lock kits arrive, I'll have an unprecedented amount of secure onboard waterproof storage.
I'm ready to take this on the road!

Just be careful not to bring too much junk. So many moto-travellers seem to think that there are no businesses enroute and way overpack. If you do decide to go to Deadhorse, Adventure Cycleworks in Fairbanks will allow you to stash gear so you aren't heavily loaded. Unfortunately, I'll miss you when you pass through Fairbanks as I'll be in the lower-48.
ReplyDeleteBTW, http://advrider.com/index.php?threads/alaska-primer.788417 is a great read...
ReplyDeleteThank you, I'll check that out!
DeleteSteph the issue with the seat lock is easily solved by installing washers to raise the latch. That way you can keep the plastic thing. About 4-5 washers does the trick. I think there's a post that explains. I'll see if I can find it.
ReplyDeleteThis comment has been removed by the author.
DeleteFound it:
DeleteOh Geeezzz...
Deletehttps://ridingadventures.ca/2013/04/30/another-day-another-fix/
and now a clickable link?!?!
Yup... that worked!
DeleteCool, I'll try that out (though I don't feel like I'm missing much without the plastic piece, do you know of a function for it beyond aesthetics?)
DeleteI'm pretty sure it supports the pet carrier and helps to stabilize the fuel port tube thing, and may also provide a stable rest for the seat.
DeleteOh, and provides some protection from inevitable fuel spills, and finally, and key for me, allows you raise the pet carrier and prop it up with the gas cap so that if you overfill the tank you don't get gas in the pet carrier.
DeleteI usually take the whole bucket out, and prop up the seat with it.
DeleteTried the washers, mostly works great! I'm finding it creaks when I sit on it though, and the additional height adds stress to the plastic bucket, which doesn't line up as well as before. I've decided to go without, for now!
BTW Steph, I love the hard side cases.
ReplyDeleteThe next obvious step is to repaint Serenity to match her new military kit. Drab green, or better yet, camo!