
The Vespa GTS 250/300 is pretty cushy for touring straight out of the crate, but here are some small additions that go the distance. I run stock inside, so really this is just a rundown of some luggage and electronic accessories I put on there.
The often-asked, long-awaited breakdown beyond the cut.
The Essentials
Mount for Phone
 |
| RAM X-Grip holds phone and cat securely. |
I use my phone for navigation, GPS tracking, and music. After a windscreen, this was the first thing I installed. The pieces: RAM X-Grip attached to a 3 inch arm, with a U-bolt base around my mirror stem (~$45 total).
I also hang a little cheapo touchscreen pen there because my winter gloves aren't touchscreen capable. And a lucky cat with peppers...because lucky.
12v Power Adapter
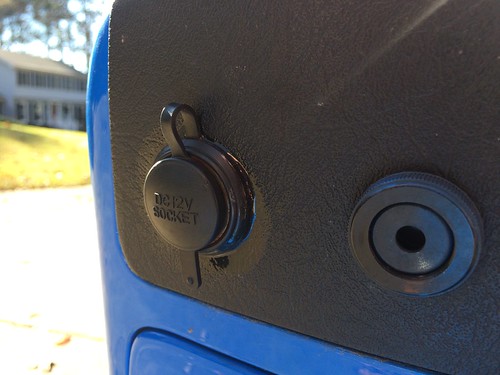 |
| We have power. |
For charging above mentioned phone. Scooterwest sells a plug and play left knee pad power plug for GT/GTS/GTV for about $50. This would be the easiest way! Before I knew it was available, I enlisted the help of a friend with wires and diodes lying around to follow Modern Vespa tutorial on installing a turn signal beeper and 12v power outlet. My outlet is always on because it's wired to the alarm, while the Scooterwest version is on only when the ignition is switched to on. However, my electric work is not as tidy, so there's that. The turn signal beeper has grown on me, but I can go without the sound of a miniature truck backing up when I'm stuck at a left turn.
The 2015 and later GTSes have a USB port inside the glove compartment. It's easier to DIY wire to the knee pad, but if you want to use the Scooterwest kit you need an additional kit.
Cruise Assists and Heavy Bar End Weights
 |
| Three in one in this photo. |
I picked up a CB2 Wide Crampbuster ($7~10) right after the phone holster. It's cheap for the extended comfort it provides, and easy to carry if borrowing other bikes. Merely rest your palm on the plastic cradle and let the weight of your hand hold the throttle open. Flip it the other way to disengage. Ahhhh.
The black plastic Throttle Assist (~$20) is a bit newer. It presses up against the brake lever to hold the throttle open without your hand. I was nervous about this assist at first, but once you're used to being able to take your hands off the bars... Fun for the plains, or just plain fun?!
I also swapped out the stock bar end weights for 500g bar end weights, to help dampen the front end wobble notorious on GTSes when you load the back.
Bonus Touring Fanciness
The above would be the first things I put on a GTS. The following are bonus rounds!
Battery Cover Eye Screws
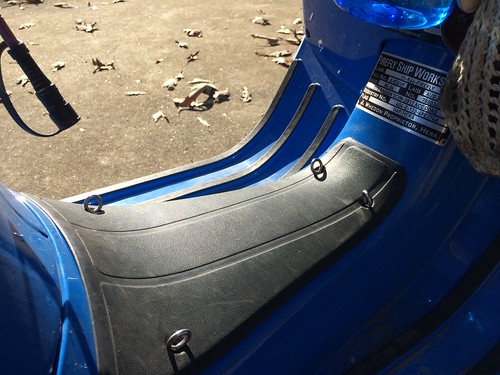 |
| Screw this. Also, spot the fan-dumb sticker. |
The cheapest, easiest modification to increase carrying capacity. Not everyone likes to block the canyon, but when living on the bike, leave no space unused! A couple small bungee cables hold my soft cooler here.
Note, if you block the canyon like I do, it's easier to get off the bike after a long ride with the addition of a side stand. I got by without it until Vespa SF installed one for me. It's not stable to leave it on the side stand, but it's much less likely to tip over when I'm attempting to step off the bike with numb legs, thanks guys!
If you've got money to spend, I've seen Classic Racks on other bikes and they look lovely.
Satechi Media Remote
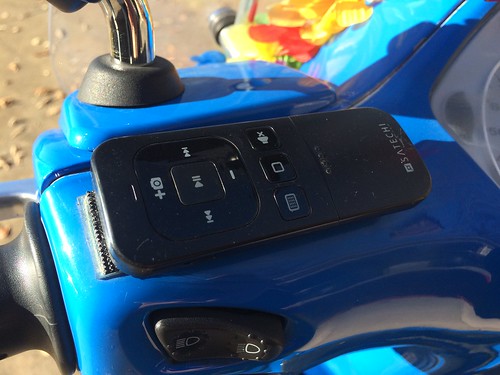
Maybe it's different for a different bike, but I like music when riding this one. The Satechi Media Remote (~$35) has a battery life that actually lives up to its claim of about 6 months, and lets me control music by rocking my left hand slightly without fully removing it from the bars. Also, it works as a remote shutter. I attached it with adhesive Velcro (~$5) on the remote side, and VHB tape (~$11) on the headset side after plain adhesive eventually failed. This way, I can pull it off in the rain or when I'm leaving the bike unattended.
 |
| Within reach, yo. |
Cowl Protecters

Not really necessary, just nice as additional tie down points. Body work is expensive and inconvenient for a Vespa (darn monocoque frame), this insurance policy is cheap by comparison. I have these from Scooterwest (~$223) because they hug the bike closer than the Vespa brand ones, but they're still bolted to the frame and not the plastic. The bike has tipped over on both sides, and the bars have proven themselves.
My side bags are attached to the grab rail and to the cowl protecters. Unfortunately, I don't remember who made my bags, only that they were cheap and came from The Internet. They're faded and fraying in some places, but have held up so far.
Aluminum Bag Hook
 |
| Hah, my seat latch button is worn off. |
The stock nylon bag hook is strong, but I overload mine mercilessly in my quest for space. The bottom hinge broke in a right-hand side fall. An aluminum bag hook (~$65) is unlikely to break except with excessive, direct, blunt force trauma. Also, it feels luxuriously solid in the hand. Ride on.
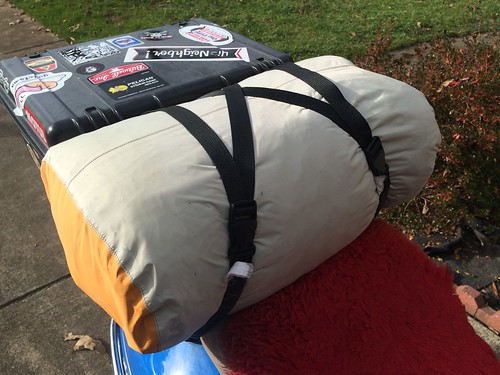
Pelican Case Topbox
 |
| Also home for stickers. |
Sing praises for my Pelican iM2450 storm case! The standard round-shaped topcases are meant to hold helmets, the rectangular shape of the Pelican is much more useful for me. Not only is it a better shape for my portable studio, the flat surface on top is the perfect height for a breakfast bar (or just a bar), or for strapping more stuff on top.
Vespa SF installed an original top case rear rack. Dave (DSM8) banged a piece of scrap aluminum into shape for a lightweight mount. Six holes were used; two for short bolts to secure the plate to the case in corners, three were added to the rear rack and sandwiched the plate between case and rack, and one big bolt went through the case and plate to the existing threaded center hole in the rear rack. Add washers and lock nuts.
 |
| Four bolts in Y-formation go through the Pelican, aluminum plate, and rear rack. Two lower bolts hold the case to the plate for sturdiness. Ignore those four extra little holes... for ventilation. |
Spare Fuel Setup
 |
| Bicycle water bottle holders zip tied to rear rack mount for spare fuel. Edge of plate folded down for rigidity. |
A little insurance for the desert, and fancier than the gallon jerry can I carried for a while. I keep a small plastic bottle in my glove compartment for Seafoam fuel stabilizer, which I add whenever I replenish the fuel bottles. East of the Mississippi, I burn the fuel and ride around with these empty, but next time I head west...
 |
| Two 30 oz MSR fuel bottles (~$20 each) held in with Velcro straps ($6). These straps are also useful for holding folding down racks or adding loops to items. |
 |
| This awesome 1/3 gal canister is from Biltwell. Thanks, Otto! All told, I can carry just over a gallon of spare fuel now. |
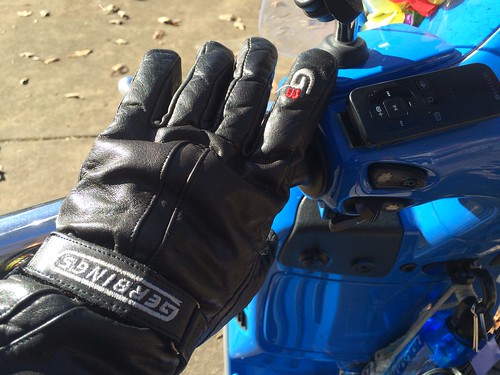
Heated Gloves Temp Controller Holster
 |
| Thanks, Zo, for printing this! |
This fancy little plastic piece is a holster for my heated gloves temperature controller! My friend took measurements from the plastic clip on my Tour Master Synergy single rheostat controller (~$35), and 3D printed a piece that I could bolt to the knee pad.
 |
| Controller slides into place. |
 |
| Tour Master controller works with Gerbings G3 heated gloves. Hot! |
The temp controller works with the Gerbings G3 heated gloves, my winter gloves. They get toasty quick!
Front Rack
 |
| Also, bungee net. I might take that spare water off though, I never remember to fill it anyore. |
More luggage options. I needed to redistribute weight towards the front to reduce wobble, so Vespa SF threw on a Vespa original front rack. Thanks again, guys, now I can carry so much stuff and people can tell me I have a nice rack!
ROK Straps
Super handy product, like bungee nets and cables. ROK Straps (~$21) allow for quicker on-and-off without fussing with hooks. I like it for attaching things to the passenger seat, since it has to be removed and flipped up to refuel.
I should probably mention that I also carry a tubeless tire kit (worm style plugs) and tools in the glove compartment or under the seat.
My pack has slowly changed over time, but that's just about everything I've done to my bike. It's been settled in this arrangement for about a year now. If I bought a proper GPS unit, I may consider threading the power supply up through the headset to poke out from under the left mirror stem gasket (an arrangement I noticed on Lostboater Ken's scoot).
If I were making any higher budget performance changes, I would consider improved suspension for carrying all this stuff!
What has been your experience with the Gerbing G3 gloves? I use them on a daily basis from October through Mid-April here in Alaska. I've had to repair broken connectors/wires numerous times per year. They seem really fragile.
ReplyDeleteYou had to repair them so often? Mine were shoved in a side bag since April of this year, but the heating elements worked fine when I pulled them out in November. I've had this pair for a few years now.
DeleteI heard they have a lifetime warranty on the heating elements, but I haven't looked into it. These are the best winter option I've found for travel – I like the handlebar mitts more when I lived in RI, but they're too bulky to pack. I would consider heated liners though, thoughts?
The heating elements have never broken. It has always been the connectors and the connection between the connectors and the heating elements. Between the G3 gloves and the heated liner, maybe a dozen repairs. So far this year, four times. Maybe the plastic gets brittle as I have been riding as low as -45°F over the years. The gloves are the best option. I also use heated grips and handlebar mitts but take the mitts off once it's consistently above +20°F or so. I can't see any of the controls. The Aerostich rain overgloves do a good job of keeping the G3 gloves out of the wind and are easier to pack.
DeleteI think that battery powered heated liners may be something to try.
Nice write up Steph. It's interesting to see the similarities in our touring setups, and the little differences. I like the Pelican case: topcase + table + bar very cool.
ReplyDeleteI'm curious about the soft side bags or did I miss that? Thanks. Duane
ReplyDeleteI don't remember where I got my side bags, except that I ordered them online. I haven't been able to find them again.
DeleteI like the soft bags for being easier to install (no need for racks). I've been interested in the DrySpec D20 drybag side bags, because mine aren't quite waterproof and I had a mold issue once when I THOUGHT they dried out...
I just recently discovered your blog via ModernVespa. Thanks for this writeup: I have a GTS 300 that I'm slowly kitting up for touring. You've helped me solve some of the puzzles I'd gotten stuck on between this post and the rest of your blog.
ReplyDeleteGlad to hear! Let me know what you come up with, I'm always curious how other people arrange their bikes.
Delete